Azure Functions running in Azure Container Apps with Dapr
Azure Functions running in Azure Container Apps with Dapr
• Azure Functions, Serverless, .NET, Azure
• 11 min read
In case your organization has embraced containers in its strategy, it’s worth noting that Azure Container Apps now can host and enable the execution of Azure Functions. Embracing this approach brings several benefits, as Azure Functions can leverage the features offered by Azure Container Apps. Let’s delve into Dapr as an illustration of this scenario.
NOTE: This is currently in Public Preview.
The Azure Function
To obtain a containerized instance of Azure Functions, we can utilize the func command to automatically generate the necessary Dockerfile for us:
In addition to that, we also need to incorporate certain Functions, specifically HttpTriggers for HttpExample and DaprExample. To achieve this, run the following commands:
publicclassDaprExample{privatereadonlyILogger_logger;privatereadonlystring_daprStoreName="function-statestore";publicDaprExample(ILoggerFactoryloggerFactory){_logger=loggerFactory.CreateLogger<DaprExample>();}[Function(nameof(SaveState))]publicasyncTask<HttpResponseData>SaveState([HttpTrigger(AuthorizationLevel.Anonymous,"get","post")]HttpRequestDatareq){_logger.LogInformation("C# HTTP trigger function [SaveState] processed a request.");varclient=newDaprClientBuilder().Build();for(vari=1;i<=100;i++){varorder=newOrder(i);// Save state into the state store
awaitclient.SaveStateAsync(_daprStoreName,i.ToString(),order.ToString());Console.WriteLine("Saving Order: "+order);}varresponse=req.CreateResponse(HttpStatusCode.OK);response.Headers.Add("Content-Type","text/plain; charset=utf-8");awaitresponse.WriteStringAsync("State saved with Dapr on Azure Functions!");returnresponse;}[Function(nameof(GetState))]publicasyncTask<HttpResponseData>GetState([HttpTrigger(AuthorizationLevel.Anonymous,"get")]HttpRequestDatareq){_logger.LogInformation("C# HTTP trigger function [GetState] processed a request.");varclient=newDaprClientBuilder().Build();for(vari=1;i<=100;i++){// Get state from the state store
varresult=awaitclient.GetStateAsync<string>(_daprStoreName,i.ToString());Console.WriteLine("Getting Order: "+result);}varresponse=req.CreateResponse(HttpStatusCode.OK);response.Headers.Add("Content-Type","text/plain; charset=utf-8");awaitresponse.WriteStringAsync("State retrieved with Dapr on Azure Functions!");returnresponse;}[Function(nameof(DeleteState))]publicasyncTask<HttpResponseData>DeleteState([HttpTrigger(AuthorizationLevel.Anonymous,"delete")]HttpRequestDatareq){_logger.LogInformation("C# HTTP trigger function [DeleteState] processed a request.");varclient=newDaprClientBuilder().Build();for(vari=1;i<=100;i++){varorder=newOrder(i);// Delete state from the state store
awaitclient.DeleteStateAsync(_daprStoreName,i.ToString());Console.WriteLine("Deleting Order: "+order);}varresponse=req.CreateResponse(HttpStatusCode.OK);response.Headers.Add("Content-Type","text/plain; charset=utf-8");awaitresponse.WriteStringAsync("State deleted with Dapr on Azure Functions!");returnresponse;}}publicrecordOrder([property:JsonPropertyName("orderId")]intOrderId);
How to run (and test) it locally? The Developer experience
Getting started can pose challenges, as it requires a certain level of prior knowledge about Dapr and Docker Compose. This understanding is crucial for troubleshooting any unexpected issues that may arise.
First of all, to be able to run the function locally with full Dapr support, make sure you have Dapr installed1 and initialised2.
Assuming that you have your Dapr environment sorted, copy the dapr\components\function-statestore.yaml file and save it to your C:\Users\youruser\.dapr\components folder. It should look like this:
NOTE: The variable value of _daprStoreName matches the metadata name on function-statestore.yaml.
Now you can run it locally with the following command:
1
dockercomposeup
NOTE: You should not modify the docker-compose.yml, it should work as is. One thing to notice is that we are using redis locally.
The docker-compose.yml file is accessible in the repository and is presented here solely for educational purposes. For more comprehensive information, kindly refer to the Dapr documentation3:
dummy-dapr - a necessary docker network to connect the services
Troubleshooting
Possible errors you might face when running the docker-compose:
Bind for 0.0.0.0:6379 failed: port is already allocated
Make sure to stop all Redis containers running on your machine.
redis store: error connecting to redis at : dial tcp 127.0.0.1:6379: connect: connection refused
Grpc.Core.RpcException: Status(StatusCode=“Unavailable”, Detail=“Error connecting to subchannel.”, DebugException=“System.Net.Sockets.SocketException (111): Connection refused
For both errors you probably have a local statestore.yml (or another file) that is conflicting, available on your C:\Users\youruser\.dapr\components folder. Try moving the files to another directory, then re-run docker-compose.
Create the container locally and push it to the Container Registry
First, we need to create the container, then we can push it to the Azure Container Registry.
Run the following to create and run the container locally:
Then get it ready to push to Azure Container Registry (ACR), by running the following:
1
2
3
4
5
6
7
8
9
10
11
12
13
14
// Login to the registry
azacrlogin--name<REGISTRY_NAME>// Create another tag that includes the ACR FQDN (Fully Qualified Domain Name)
dockertagdemo-az-function:v1<LOGIN_SERVER>/azurefunctionsimage:v1.0.0// Push the image to the registry
dockerpush<LOGIN_SERVER>/azurefunctionsimage:v1.0.0// Enable admin account
azacrupdate-n<REGISTRY_NAME>--admin-enabledtrue// Retrieve admin account details
azacrcredentialshow-n<REGISTRY_NAME>--query"[username, passwords[0].value]"-otsv
WHERE:
REGISTRY_NAME is the ACR name. i.e.: yourcontainerregistry.azurecr.io
LOGIN_SERVER is the ACR FQDN. i.e.: yourcontainerregistry.azurecr.io
NOTE: For detailed explanations of the commands, check the thorough explanation from this Microsoft Docs4.
Provisioning the Container App
To provision a new instance of container apps, run the following commands:
1
2
3
4
5
6
7
8
9
10
11
12
13
14
15
// The AZ CLI needs upgrading, an extension added and providers registered
azupgradeazextensionadd--namecontainerapp--upgrade-yazproviderregister--namespaceMicrosoft.Webazproviderregister--namespaceMicrosoft.Appazproviderregister--namespaceMicrosoft.OperationalInsights// Provision resource group
azgroupcreate--nameAzureFunctionsContainers-rg--locationaustraliaeast// Provision container app environment
azcontainerappenvcreate--nameMyContainerappEnvironment--resource-groupAzureFunctionsContainers-rg--locationaustraliaeast// Provision storage account
azstorageaccountcreate--name<STORAGE_NAME>--locationaustraliaeast--resource-groupAzureFunctionsContainers-rg--skuStandard_LRS
WHERE:
STORAGE_NAME is a unique storage name in Azure, that must contain 3 to 24 characters numbers and lowercase letters only.
NOTE: For detailed explanations of the commands, check the thorough explanation from this Microsoft Docs5.
Create the Azure Function in Container Apps
With the Container Apps environment running, run the following command to create the Azure Function in it:
STORAGE_NAME is the storage created in the previous step.
LOGIN_SERVER is the ACR FQDN. i.e.: yourcontainerregistry.azurecr.io
ADMIN_USER is the ACR registry admin.
ADMIN_PASSWORD is the ACR registry admin password.
Configure a user-assigned identity for the Dapr-enabled function
This step enables us to grant permissions to a user-assigned identity for accessing a blob storage account.
One of the advantages of Dapr’s technology abstraction is that we can effortlessly assign a supported Azure service and expect it to work seamlessly.
Given our usage of state management, opting for Blob Storage offers a simpler and more cost-effective solution. The best part is that we don’t need to make any changes. Everything will work smoothly without requiring any modifications!
To create the user-assigned identity, run the following PowerShell commands:
// Set variables
$ResourceGroupName="AzureFunctionsContainers-rg"$Location="australiaeast"$StorageAcctName="<STORAGE_NAME>"// Load module and create the user-assigned identity
if(Get-Module-ListAvailable-NameAZ.ManagedServiceIdentity){Write-Output"AZ.ManagedServiceIdentity module is already installed."}else{Find-ModuleAZ.ManagedServiceIdentity|Install-Module-ForceWrite-Output"AZ.ManagedServiceIdentity module is not installed, installing now."}New-AzUserAssignedIdentity-ResourceGroupName$ResourceGroupName-Name'functionAppIdentity'-Location$Location// Get ids
$PrincipalId=(Get-AzUserAssignedIdentity-ResourceGroupName$ResourceGroupName-Name'functionAppIdentity').PrincipalId$IdentityId=(Get-AzUserAssignedIdentity-ResourceGroupName$ResourceGroupName-Name'functionAppIdentity').Id$ClientId=(Get-AzUserAssignedIdentity-ResourceGroupName$ResourceGroupName-Name'functionAppIdentity').ClientId$SubscriptionId=$(Get-AzContext).Subscription.id// Load module and create assignment
if(Get-Module-ListAvailable-NameAz.Resources){Write-Output"Az.Resources module is already installed."}else{Find-ModuleAz.Resources|Install-Module-ForceWrite-Output"Az.Resources module is not installed, installing now."}New-AzRoleAssignment-ObjectId$PrincipalId-RoleDefinitionName'Storage Blob Data Contributor'-Scope"/subscriptions/$SubscriptionId/resourceGroups/$ResourceGroupName/providers/Microsoft.Storage/storageAccounts/$StorageAcctName"
WHERE:
STORAGE_NAME is the storage created in the previous steps.
NOTE: For detailed explanations of the commands, check the thorough explanation from this Microsoft Docs6.
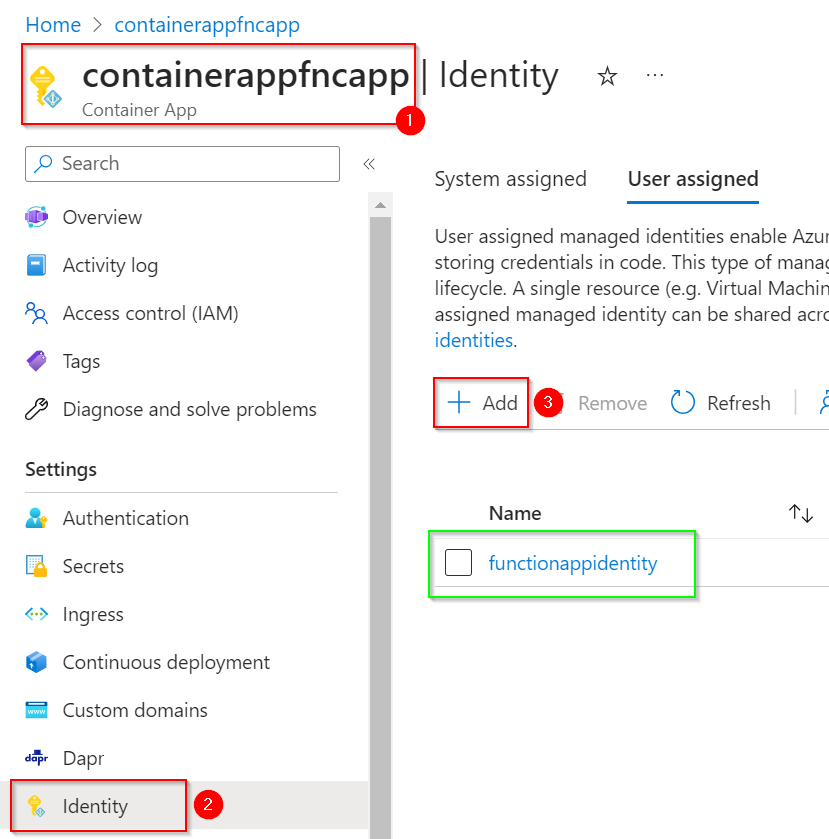
Now you need to associate this user-assigned identity to the Container App Managed Identity:
NOTE: My container app was named containerappfncapp. Feel free to pick any name.
Configuring the state store component
This particular step is well-documented on Microsoft Docs7, however, I encountered an issue with it that remains unresolved, as indicated by an existing Github issue. You are welcome to give it a try, and kindly share your feedback by leaving a comment on this post if the approach proves successful.
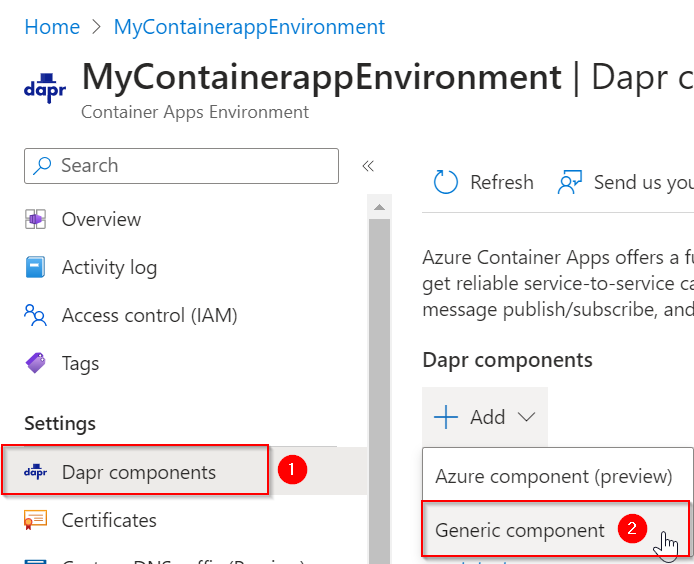
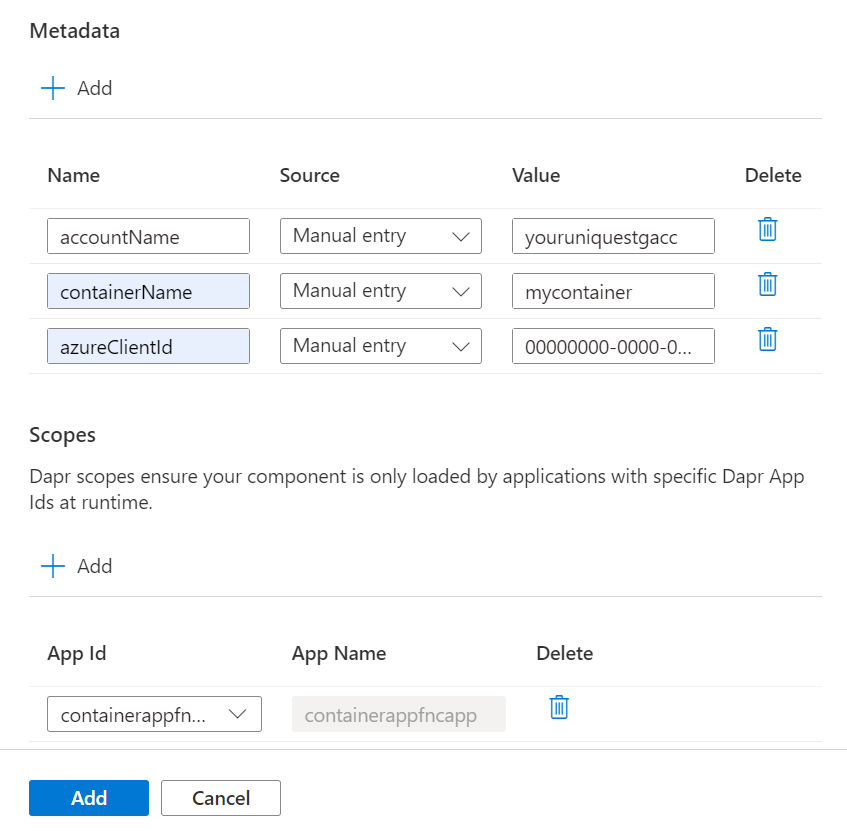
As a workaround, I used the user interface (UI) and manually added the Dapr component.
Go to the Container Apps Environment, and add a new Dapr Generic Component.
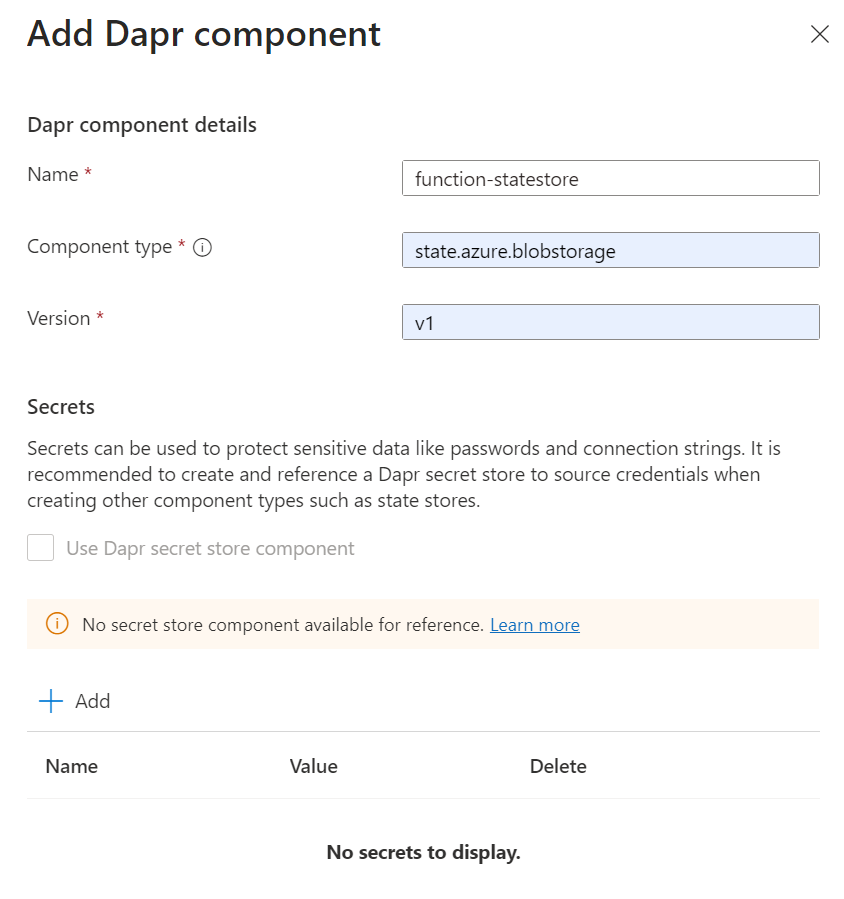
The metadata values will come from the intended statestore.yaml file (from Microsoft Docs):
STORAGE_NAME is the storage created in the previous steps.
MANAGED_IDENTITY_CLIENT_ID is the ClientId obtained in the previous step.
APP_NAME is the function name.
On UI it should look like this:
Time to test it
Here’s the thrilling part about these configuration steps: the exhilarating moment when everything comes together and you witness it running flawlessly!
Let’s query some APIs, with the following CURL requests:
You get State deleted with Dapr on Azure Functions! as a response.
As you revel in the satisfaction of witnessing the seamless functionality achieved thus far, it’s time to engage your sharp intellect and raise a critical question:
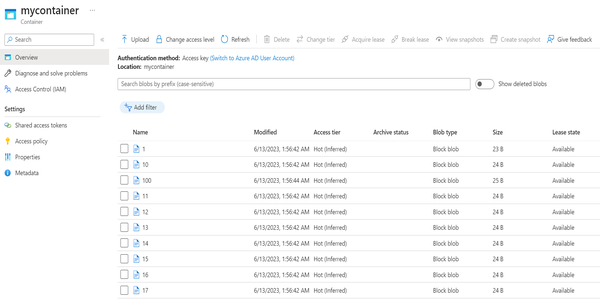
What about the storage?
Run the SaveState query and look at the blob storage:
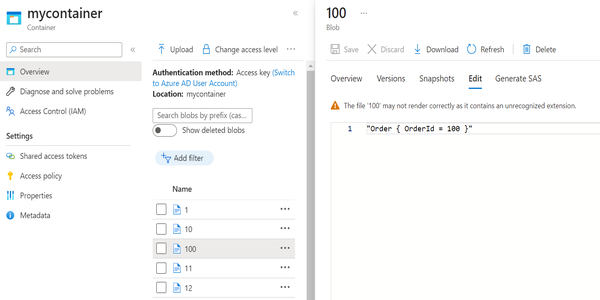
Click in a blob to see the details:
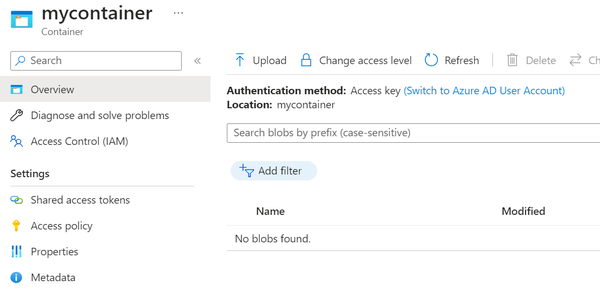
Run the DeleteState query and look at the blob storage:
Join the conversation! Share your thoughts and connect with other readers.