MCP - From Development to Azure Governance Series: Part 1 - Exploring MCP Servers with .NET
Welcome to the start of a hands-on series on MCP development and governance. Throughout these articles, we’ll explore how to build, deploy, and manage MCP servers using .NET and Azure. In this first part, you’ll learn how to create an MCP server with tools in .NET—laying the groundwork for future Azure deployment and governance.
Introduction to MCP Servers
MCP (Model Context Protocol)1 enables AI developers to extend the capabilities of AI models by integrating them with external servers. These servers can be hosted on various platforms, including cloud services like Azure.
While the basics of MCP have been widely covered in technical articles and documentation, here’s a concise overview. For more in-depth information, check the official documentation.
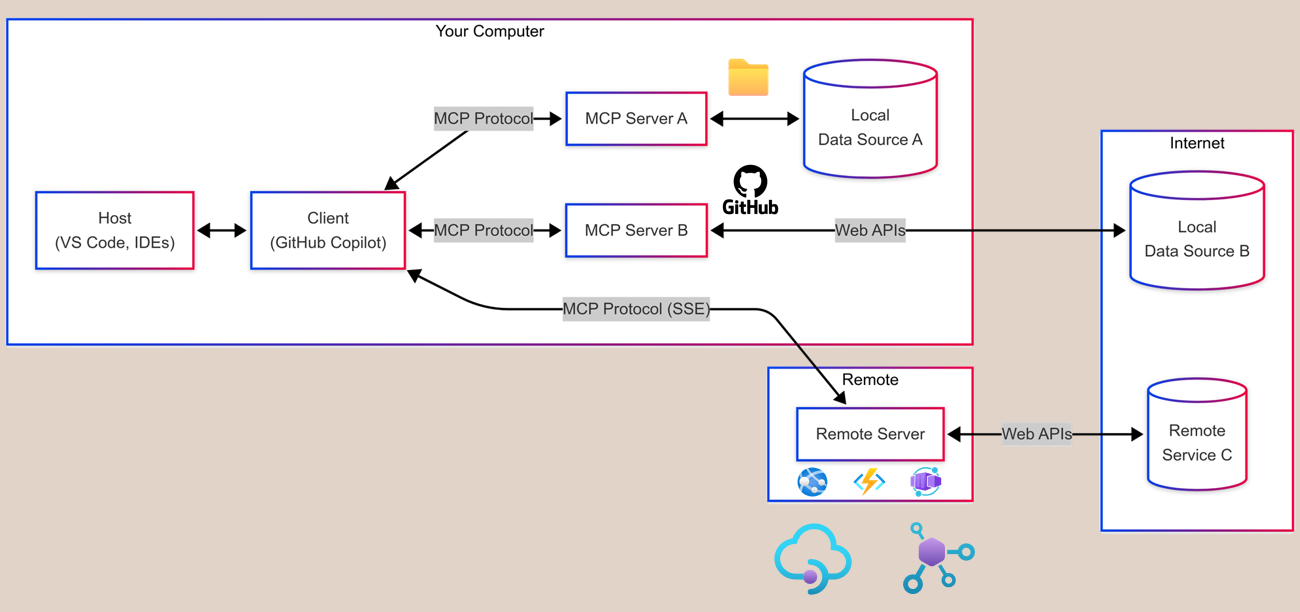
Depending on your use case, MCP servers can use several transport mechanisms:
- STDIO (Standard Input/Output): Communication occurs via standard input and output streams, commonly used for local or CLI-based integrations.
- Streamable HTTP Responses: Allows clients to receive data incrementally as it becomes available, improving responsiveness for large or long-running operations.
- SSE (Server-Sent Events): Enables servers to push real-time updates to clients over HTTP, ideal for streaming data or events.
Note: Sometimes, API endpoints are organized by transport type, such as
/mcpfor standard HTTP or/ssefor Server-Sent Events. These URL paths are conventions to help clients select the appropriate transport, but the underlying protocol (streamable, SSE, etc.) is determined by the server’s implementation and response handling, not by the URL alone.
Setting Up an MCP Server with .NET
In this section, we’ll create an MCP server step by step. By following these instructions, you’ll build a simple restaurant picker called LunchTimeMCP using .NET as your foundation.
1. Create the Console App
First, create a new folder and initialize a console project:
| |
2. Install Required NuGet Packages
Add the essential packages for MCP server development:
| |
3. Program.cs Setup
Configure the host builder, dependency injection, and MCP server transport in Program.cs:
| |
The MCP library handles the server setup and protocol implementation. You can register your own services and tools as needed.
4. Implement the RestaurantService
Create a new file named RestaurantService.cs in the LunchTimeMCP project. This service manages restaurant data, visit tracking, and statistics.
| |
The
[JsonSerializable(...)]attributes and theRestaurantContextclass enable source generation forSystem.Text.Jsonin .NET. This is especially valuable for high-performance applications, AOT deployments, or when working with APIs and tools that frequently serialize/deserialize objects.
5. Implementing MCP Tools
Next, expose your restaurant functionality to AI assistants by implementing MCP tools in RestaurantTools.cs.
RestaurantTools.cs File Structure
| |
[McpServerToolType]marks the class as containing MCP tools.- Constructor injection provides access to
RestaurantService.
Tool Implementation Overview
Each tool follows the same pattern:
- Use
[McpServerTool]to register with MCP. - Add descriptive
[Description]attributes for the AI to understand the tool’s purpose. - Use dependency injection to access the
RestaurantService. - Return JSON-serialized responses using the
RestaurantContext.
Tool 1: Get All Restaurants
| |
- Simple method with no parameters.
- Returns JSON-serialized list of restaurants.
Tool 2: Add New Restaurant
| |
- Each parameter has a descriptive
[Description]attribute. - Returns the newly created restaurant object as JSON.
Tool 3: Pick Random Restaurant
| |
- Handles the case when no restaurants are available.
- Returns a friendly message with emoji and the selected restaurant data.
Tool 4: Get Visit Statistics
| |
- Returns formatted statistics about restaurant visits.
With these tools, your MCP server exposes a complete set of restaurant management operations to AI assistants.
6. Register Tools & Services in Program.cs
Finally, register your tools and the service in Program.cs:
| |
AddSingleton<RestaurantService>()registers your service for dependency injection..WithTools<RestaurantTools>()makes your tools available to the MCP server.
7. Testing Your MCP Server
You can test your LunchTimeMCP server locally using the MCP Inspector tool.
Step 1: Navigate to Your Project
| |
Step 2: Build and Test Your Server
| |
Step 3: Install and Run MCP Inspector
Install MCP Inspector globally:
| |
Or run it directly with npx:
| |
When you run the inspector, you’ll receive a URL with a pre-filled token to open in your browser.
Step 4: Connect to Your MCP Server
In the MCP Inspector web interface:
- Transport Type: Select “STDIO”
- Command:
dotnet - Arguments:
run - Click Connect to establish the connection.
- Click List Tools.
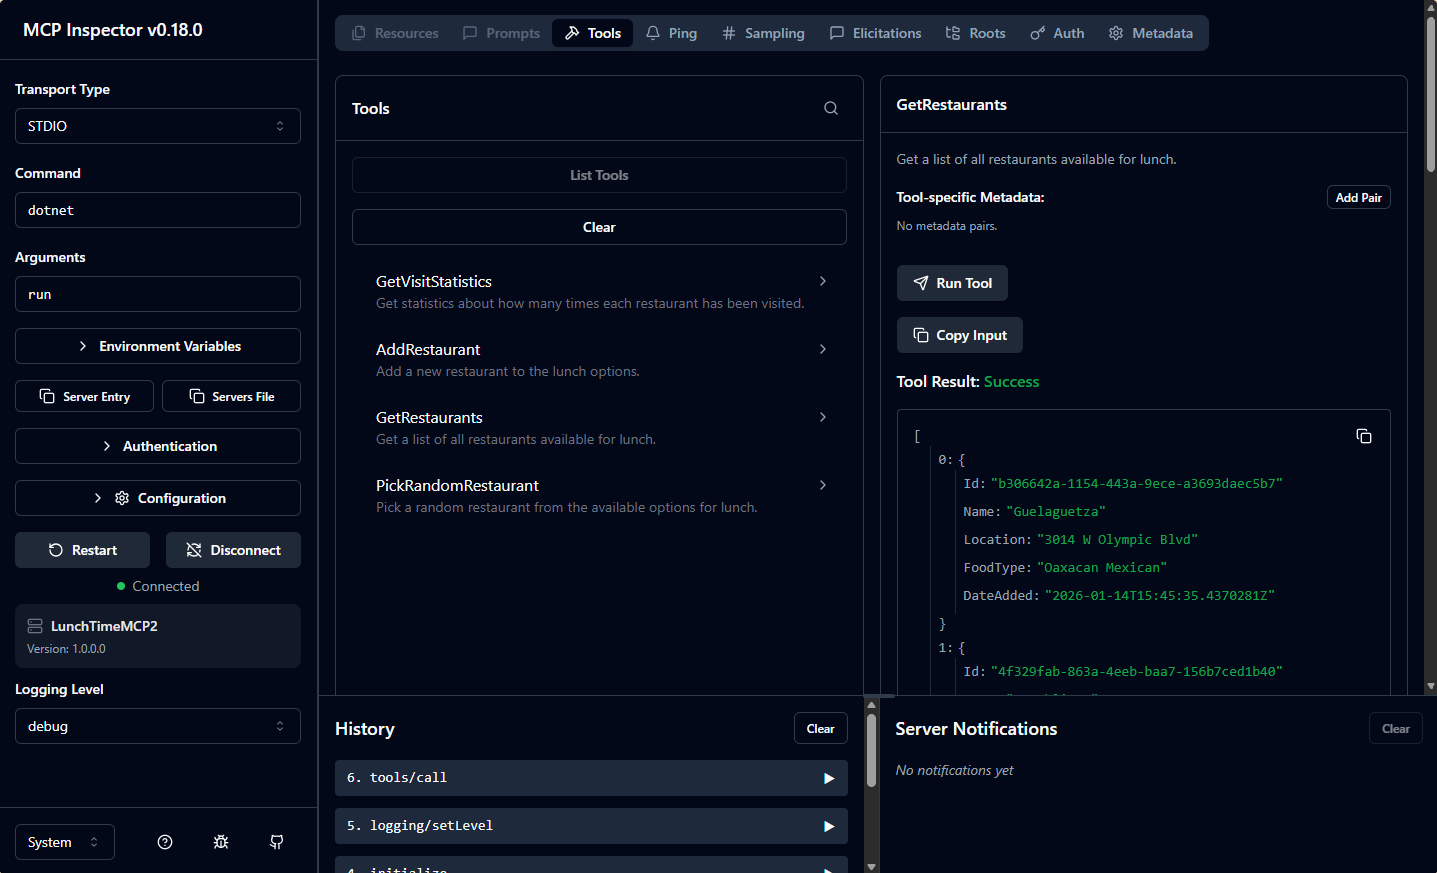
You should see your four tools appear in the inspector:
- GetRestaurants
- AddRestaurant
- PickRandomRestaurant
- GetVisitStatistics
Step 5: Test Each Tool
- GetRestaurants: Returns the 10 seeded restaurants.
- AddRestaurant: Add a new restaurant with name, location, and food type.
- PickRandomRestaurant: Selects and tracks a random restaurant.
- GetVisitStatistics: Shows access counts for visited restaurants.
Your LunchTimeMCP server is now ready for local testing and further development. In the next part of this series, we’ll explore how to build and deploy MCP servers on Azure.
Microsoft Learn MCP Server overview Microsoft Learn MCP Server overview ↩︎
Join the conversation! Share your thoughts and connect with other readers.